Pages

Thursday, March 20, 2014

Easel Back Post It Note Holder


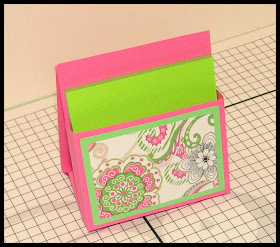
One of my favorite projects I made in CCR was this little Easel Back Post It Note Holder. I found this idea on the Classy Crafters blog using the SU envelope die. I don't use dies, so I created a simple box. But you could add a scallop flap if you wanted.

 Having the CCR file made it so easy to make this little holder and I've made a bunch of them for teachers, secretaries and others. So I knew right away I wanted to recreate this file in Design Space and be able to cut it with my brand new Cricut Explore!

It was so easy to use images from the free Craft Room Basics image set and the free score line! Here are the three "holder" pieces. Fold where scored and glue together to made the easel back and the box.


You will have these two pieces. The smaller squares {not pictured} are layered to decorate the front of the box.
Then you glue the back of the box to the front of the easel. So easy! The other pink square is for those times when you are using cardstock that is only textured on one side. It slides into the box and is glued in place. Not much of it shows when the post it notes are in the box, but things like that still bother me! You can omit that piece from the file, if you don't need it, by clicking the eye in the layers box in Design Space.

 Then, add your post it notes.


And your box is ready to embellish! These boxes will have rosette and monogram added for each recipient.

What will you make with your new Cricut Explore?
Tuesday, March 18, 2014

Decorating for Mini Mania with my Explore

For Mini Mania, I decided I would use a flower theme and the colors pink, blue and purple. I bought paper goodie bags at Party City and wanted to dress them up a bit. Using a basic flower and Design Space, I was quickly able to cut 16 flowers, centers and leaves to add to the bags.


And it was then so easy to use that same flower to add to the water bottle flavor packet tags I made with paper to match the color scheme. Just adjust the size and press Go!

And did you notice, the same flower, in a smaller size was cut and glued to little packets of Sixlets candy. I just adjusted the size again, entered a quantity of 60 and let the Explore do the work! It laid the flowers and centers out on the mats and told me when to change the paper color. I glued the centers onto the flowers and then used a glue dot to stick the flowers to the candy packs. I did also make the flower pens and add the pattern paper to the note pads. But the Explore didn't get to help with those!


For Sunday morning's table treat, I made these cute little treat boxes. There were also pink ones, but I didn't get a picture of those. The box was made using the Envelope Punch Board, but the flower is the same one from the other projects, just cut at a different size.

I was very impressed with how easy it was to pick my design, adjust the size and then tell Design Space how many I wanted. No need to add 60 flowers to the mat or copy and paste and then place them within the cutting margins. I had one flower of each size and Design Space did the rest! I'm looking for to using the Explore to make all the "stuff" for Circle Mania in September when I will have 60 crafters attending the weekend event.

Friday, March 14, 2014

Writing Name Tags with my Explore

I'm hosting a Mini Mania weekend to celebrate the launch of the Explore! A lot of my Cricut crafty friends have purchased the Explore and we're all learning the different features and the software, Design Space. So what better way to learn it than to get together and help each other! And, the socializing and shopping are added fun!

There are 16 people attending and will be at a local hotel. I wanted to have name tags for the event and turned to my Explore. This was a good project to test out the new dual head on the Explore and see how well it can write and then cut without having to switch out the pen for blade or vice versa. I set up the project in Design Space. I chose my shape, used the text feature to add the names to the canvas and then used the attach feature to make sure the name would be written exactly where I wanted it. The results were fantastic! All I had to do was glue the pretty filigree frame {which I also cut effortlessly with the Explore}, add a little ribbon flower and a pin back.


Wednesday, March 12, 2014

My Explore!


Just for fun, I added a little vinyl to my Explore! The image is a jpeg of a name stamp that I had made. After I uploaded it to Design Space, I removed the "handmade by" and cleaned the image up a bit and then cut it in vinyl. I weeded the excess vinyl away and used transfer tape to move the entire image from the backing paper to my Explore.

And, since I'm hosting a Mini Mania in honor of the Explore launch {and the fact that I just like to get together with my crafty friends!}, I'll easily know which of the many Explores in the room is mine! I might even flip the image and cut it in iron on vinyl to add to the tote bag!

Monday, March 10, 2014

Cut It Free for a Week ~ Leprechaun


The "Cut It Free for a week" images this week are the St. Patrick's image set. Even though it's a CCR exclusive set, it works the same way the regular images on physical carts work. So when you get ready to cut and assemble, don't forget the SHIFT layers! 


There are also several other images in this set. . .perfect for your St. Patrick's Day projects!


Sunday, March 2, 2014

St. Patrick's Day Project Inspiration

Here are a few past St. Patrick's Day projects I made with my Cricut:

Teddy Bear Parade Leprechaun with a pot of gold

Lucky Shamrock and tiny Leprechaun


Candy Purse

Leprechaun easel matchbox coin treat holder

Shamrock Treat Holder

I'm busy learning and playing with my new Cricut Explore and Design Space {loving it!} so come back for more projects and info on the Explore!