Pages

Thursday, February 27, 2014

Info on the new Cricut Explore!

Want more factual info, like this, on the Cricut Explore? Well look no further than Cricut's own FAQ page on the cricut.com website! Get the info you need without someone else's interpretation of what the Explore can do or how to do it! 

Cricut FAQ

On the FAQ page, you will get questions and answers like the following example. You can also search for specific topics. You will find info on all the features of Design Space as well as the Explore.

Q: How do I start designing from a canvas?

A: To start a project from a canvas, on the home page, click “Create New Project”. You will be taken to the design screen. On the left side of the screen, click “Set Canvas”. A new window will open showing the different canvas types. Choose the canvas that is most similar to the project you are going to create. This will help you design and visualize the project prior to cutting.

My Explore should be arriving soon and I'll post some of my own reviews and tutorials. Until then, I'll be crafting with my Expression and CCR!

Wednesday, February 26, 2014

Cricut Cutting Guides

People are always asking for info for the cut settings for different media in their Cricut. I've got several on the Cricut Help page {along with some other helpful hints and tips}.

Here is the one I created:


Here is one from PC:

And here is PC guide for the Expression2:


 Hope these help some of you that are having problems getting good, clean cuts from your Cricut!

Wednesday, February 19, 2014

Cricut Explore and Design Space Videos


I'm so excited about the new Cricut Explore! The Design Space software looks amazing! I've been watching lots of videos and want to share the videos that have helped me the most with you. If you have a helpful video on either the Explore or Design Space, use the InLinkz button to add it to the collection.


Friday, February 14, 2014

Minion Hugs Valentine!


I made this cute little minion in CCR using Craft Room Basics, Paper Doll Dress Up {shoes}, Funny Faces {mouth} and Billionaire {glasses although I altered them with Craft Room Basics}.


I thin I might add some "buttons" to the overall straps and try to replicate the logo for his overall bib. but other than that, I think I'll make my own army of minions!

Happy Valentine's Day and thanks for stopping by!

Thursday, February 13, 2014

Monster Hugs Valentine


 How about two cute little monsters hugging a chocolate heart? I made these in CCR using images from CTMH Artbooking {body}, Craft Room Basics {eye, arms/hands and feet}, Bump in the Night {mouths} and Paper Doll Dress Up {bow}.


Once you cut them out, glue on the details.


Use a glue dot to hold the candy in place.


Fold the arms at the edge of the body toward the center. Use your scissors to cut a small slit in one arm {if you cut it in both, you end up with a butterfly looking thing on the front of your monster} and slip it over the other to make the "hug".


Thanks for stopping by!

Sunday, February 9, 2014

Another Box from the Box It Up Cart

 Here is another cute box from the new Box It Up cart! I am loving all the boxes! It a square box with a heart cut out on the top and the corner of all four sides. I used white to fill in the heart on the top but I think it would be a great treat box with a piece of acetate in the opening so you could still see the goodies inside. the scallop heart is from the Artiste cart and was left over from another project. The My Valentine sentiment was cut from a leftover piece of cardstock and layered on the red cardstock.

Each corner has a little heart cut out and those I backed with red cardstock. I love that the box is designed so there are "flaps" to fold down, giving the inside of the box a finished look.

I'll be making more of these boxes, so come back to see what else is on the Box It Up cart!

Saturday, February 8, 2014

Bee My Valentine!


I made this treat box using the new Box It Up cart! What fun it is to have a new cart with lots of boxes on it! I have to admit, I do love boxes! It cut like a dream and went together very easily. I added the bee from Create a Critter 2 and I now have a somewhat "cheesy" but cute Bee My Valentine treat box.


 The honeycomb design is on all four sides of the box and the top! Anybody need a bunch of tiny hexagons? The liner pieces are also one of the cuts so you don't have to mess around with cutting them by hand and hoping they fit!

The bottom closes like the milk carton and some other boxes on the Tags, Bags, Boxes and More 2 cart. Fold the 3 flaps in and tuck the tab on the fourth flap to hold everything in place. Easy peasy!

Can't wait to make some of the other boxes! But for now, I think I'll make some more of these for Valentine gifts!

Heart Shadowbox for the Valentine's Day Blog Hop!

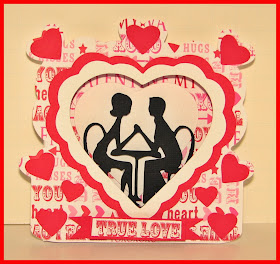
Welcome to our 2014 Valentine's Day Blog Hop!  You should have reached here from Lori's blog The Singing Shell.  If you are just joining us, please start at RockinRenee's blog.  There are so many great projects and I don't want you to miss a single one!  Today we are highlighting Valentine's Day inspired projects.  For my project, I made a Shadowbox Valentine!


I was inspired by a new shadowbox kit that I saw on a blog post from someone attending Winter CHA. It was really cute, but at $17 each plus shipping, I knew I wanted to make my own! 


I started in CCR with the scallop heart and it's layers from the CTMH Artiste cart. I then added a rounded rectangle from Craft Room Basics to make the base. I added smaller hearts to various points on the base.  After the base was completed, I welded all the "parts" together.


To make the box for the shadowbox part, I measured the width of the base {which was 3.75 inches} and added .5 inches for the sides of the box and .25 inches for the flap that would attach to the back of the base. For a base this size, I used a 5.75 inch square. I scored each side at .25 inches and .75 inches.  I cut away the corner pieces to create tabs. {I'll make another one and add photos}


I glued the box to the back of the base. Inside the shadowbox, I added a white heart and then pop-dotted the couple from the Sweethearts cart.


I cut the words True Love from the paper, backed it with red to make a little banner and added it with pop dots. 

If you would like the .ccr file for this project, leave your email address in the comments and I will send it to you.

Thank you for joining the Blog hop and visiting my blog! Since I'm the last blog on the hop, I hope you enjoyed hopping along with us! I don't have a giveaway specifically for this hop, however I am giving away a brand new Hello Kitty Greetings cart when I reach 1000 blog followers! So before you go, scroll down to that post and comment and follow my blog for a chance to win the Hello Kitty Greetings cart!

Valentine Blog Hop
1. RockinRenee - I came, I saw, I created.
2. HappyScrapper64 - Random Thoughts of a Scrapbooker    

3. gonescrappin - Col's Creative Corner  
4. Hrvatica  - Croatian Crafter
5. Scootingranny - Scootingranny's World
6. MamaC - Carolyn's Creative Corner

7. Greenie8705 - Gina Beana's Crafts
8. MariaJ - Stamp, Cut, Create!
9. Di&Co - Creating Is Like Breathing
10. Dragonfly50 - Designs by Dragonfly
11. TiffysMom - Angie's Paper Passion
12. *Violette* - Whimsical Treasures
13. cricutaddicted - ScrappingForMoreFun
14. LoriSjogren - The Singing Shell
15. scrapalette - Around the Block with Scrapalette
<<<<<You're done!


Monday, February 3, 2014

Win a Hello Kitty Greetings Cart!


While cleaning and sorting through some boxes, I found a brand new-still-sealed-in-the-package Hello Kitty Greetings cart! My first thought was "SCORE"! Any Cricut fan knows these carts are selling for $100+ on ebay. And that's for used, and often times linked, carts. So I put it aside, thinking I would post it for sale on ebay. But then I decided I would just give it away to one of my blog followers!

So, the day after I reach 1000 followers, I will pick a winner and they will receive this Hello Kitty Greetings cart. You must follow my blog using the Join this Site option, so it will increase the number of followers shown. If you Follow By Email, that will not change the number of followers and I cannot verify if someone is following by email. If you aren't already a follower, use the Join this Site to follow my blog and leave a comment on this post. If you're already a follower, just leave a comment on this post. That's all you have to do.

When my followers reach 1000, I put all the names of those who are following and have commented on this post "in the hat", draw a winner and send them the Hello Kitty Greetings cart!

Thanks to all who follow my blog, who visit my blog and who leave comments on my posts! Good luck!

Sunday, February 2, 2014

Hugs and Kisses Valentine Card


This is a cute little shape Valentine card I made using the Smiley Cards cart and CCR. I just had to weld two of the shadow images together to make the card base. Then it was just a matter of cutting the layers and gluing it all together! Cute, easy and fast!


These are two Artist Trading Cards I made for the ATC contest at the Stamp Show.  The theme was Mardi Gras. For the top card, I used. . .lamp post ~ Christmas cart, Marti ~ Quarter Note, Gras ~ Plantin Schoolbook, mask ~ Chic and Scar , saxaphone players ~ Quarter Note. For the second card. . .the background ~ Simple Cards, Mardi Gras ~ Billionaire, the hat ~ New Orleans Party, the mask~ Art Deco. The top card came in 2nd place on Sunday and the bottom card came in 3rd on Saturday.

Saturday, February 1, 2014

Past Valentine Projects

Heart Basket


Bear Hugs Treat Box


Hogs and Kisses Treat Box


Valentine Mailbox


Candy Tote

Candy Purse


Valentine Cube Box


Chocolate Lovers Box


Candy Treat Bag