Showing posts with label gift. Show all posts

Wednesday, January 2, 2013

A Few More Christmas Gifts

For each of my Sister-In-Laws, I added their name and Merry Christmas to a plastic platter. I used Plantin Schoolbook for the name and Quarter Note for the Merry Christmas. The platters came from Walmart.


For my nephews and niece, I found ear buds with a retractable cord {oh how I dislike those wires flopping around}. Since they were all the same, I used a bit of vinyl and added a monogram. The boys have a single letter monogram that I made using Varsity Letter and the girls have a 3 letter monogram I made using Stork's Delivery.


And my cute little puppy dog got a pink tote bag {to carry all her stuff when she goes to be boarded} and I added her name using Heat Transfer Vinyl.


Tuesday, January 1, 2013

All Hearts Come Home for Christmas

This is a floating frame {we placed a piece of white paper in the frame because she wanted to display it on her buffet table} I made for my MIL for Christmas. I used a variety of Cricut carts {Craft Room Basics, Something to Celebrate, Art Philosophy, Joys of the Season, Christmas, MS Seasonal Cake Art, Beyond Birthdays and Quarter Note} and designed it in CCR. I then cut the design in vinyl and used transfer tape to apply it to the outside of the frame. I used a 12 x 12 frame from Hobby Lobby.


Monday, December 24, 2012

Disney in a Frame


My sister loves Disney. . .probably more than I do! She and her husband just recently returned from a trip to Disney World. While there, they took full advantage of the Disney photographers and photo pass. She has some great photos, so I decided to create a frame for her to showcase her favorite photo. I took a collage frame I purchased a Michael's and added some vinyl I cut with my Cricut and the Mickey and Friends cartridge and viola! A gift I almost didn't give!

The frame as purchased:


I used CCR to hide all the interior cuts of the images and applied the vinyl to the outside of the frames. I inserted colored card stock to each frame. I then made a simple phrase in white vinyl and applied it to a piece of black card stock to fill the center frame. I cut the words Disney World 2012 in the black vinyl and applied those to the outside of the frame. When she removes the black card stock and replaces it with her photo, the words Disney World 2012 will still show to commemorate their trip.


If she doesn't like it, I'll gladly take it back!  :)

Monday, November 19, 2012

Christmas Tags from free images in CCR

Provo Craft has been giving free images to use for a week in CCR. . .sort of a try it before you buy it promo. Well, this week the images are some of the Holiday Cards. I really like the images, but I'm not a card maker! So what's a crafter to do? Use CCR to change them up and make them into tags!


I used CCR to "hide" the card edge and added the tag from George and Basic Shapes. I cut a solid white tag to use as the base. And, because I knew they might be "fiddly" to glue down, I cut them in red vinyl.  Easy Peasy. . .beautiful tags! And the great surprise was, the part that I weeded away was usable too! I put them on some glass candy jars.


These images are free for anyone with a CCR account to use. And yes, CCR is a free design program for your Cricut! Off to cut a few more and the "freebies" are usually changed on Wednesdays!

Thanks for stopping by!

Friday, November 16, 2012

Book of Thanks


This is a Book of Thanks I made for Thanksgiving. It's a box that's looks like a book from the sides and opens like a book. The folded paper that makes up the sides, creates a "box" that can hold treats, a diorama scene, a mini album, mementos and cards or whatever you want. Just adjust the measurements of the "pages" to fit your need. This is the third one I've made and they've all been different sizes. This one is approximately 5.5 inches X 7 inches.


I first saw this book/box on Wenche's blog a few years ago. She has a tutorial and although it is in Norwegian, Google Translate makes it easy to understand. I used the Cricut Mini Gel Pens to draw the title {which is from the Thanksgiving cart and the Quarter Note cart} and then colored the letters in by hand. I cut the title and the shadow using the Lacy Labels cart.


I chose to use the pilgrim couple from the Speaking of Fall cart to fill the "box". I made a pocket using the cornucopia from the Celebrate With Flourish carts and tags from the George and Basic Shapes cart. The plan is to take the book to Grandmother's house for Thanksgiving and have each person write on a tag what they are thankful for this year.

Wishing everyone a Happy and Safe Thanksgiving! 

Tuesday, November 6, 2012

Box of Sunshine for Gina!

My dear friend, Gina, lives in NY and was in the path of destruction created by Hurricane Sandy last week. Fortunately, she is safe and her home is still standing. To cheer her up a bit, I sent her this "box of sunshine".

I made the card using Doodlecharms and the new decorative tiles embossing folder. Inside the box are all the  "yellow" items I could fit in!


I hope it brightens her day and makes her smile. She certainly deserves it!
Keeping you in my thoughts and prayers Gina.

Sunday, May 13, 2012

Keys to My Heart


This is a little binder ring with keys of my family! I printed "Keys to my Heart" on my printer and then used my Cricut to cut the heart.  I used CCR to size the keys. The keys are from the Sophisticated cart and Sophie cart. I cut a solid key, then layered on the photo and then layered on the key that had the cutout so the photo showed through.


Hope everyone has a great Mother's Day!

Tuesday, May 1, 2012

Tea Cup Pin Cushion from TBBM2!

The Blog-iversary Celebration post is HERE

I've always loved the vintage tea cups that were made into pincushions but I was afraid one might be knocked from my sewing area and break. So, when TBBM2 was released, I knew right away I wanted to make the tea cup and turn it into a pin cushion. Finally, I did it!


And, it was so easy! The tea cup scores, cuts and assembles quickly. Before assembling, I used an antique gold pen to edge the cup, handle and saucer. I cut a paper doily from the Martha Stewart Elegant Cake Art cart and glued it to the saucer. I then used a styrofoam egg and covered half of it with felt. Glued that into the tea cup. Added some "pearls" and a ribbon with a flower. Viola! Now if my pincushion should hit the floor, it might bend. . .but it won't break!

Sunday, March 11, 2012

Purse Treat/Gift Card holder

Hi again hoppers and other visitors! It day two of the SweetSassyDiva Birthday Blog Hop and the line up is the same as for day one. So you should have come to my blog from Jen's  http://scrapaholicjen.blogspot.com/  but if you didn't or you want to start at the beginning, head to Bobbi Jo's blog   http://sweetsassydiva.com/.

My project for to day is another purse! But this one is a treat/gift card holder. I made the purse using Tie The Knot and Kate's ABCs carts. The closure for the purse is from Fabulous Finds and has a velcro dot under it. And the pink flower is from Flower Shoppe.


And inside the purse are some chocolate kisses and a gift card to Joann's! How fun!


I hope you enjoyed today's project! Now head over to Anita's blog http://www.anitaandbugs.blogspot.com/. Thanks for visiting my blog and hopping along with us!  :)


Saturday, August 13, 2011

Tea Light Cake


Yes, today is my birthday! And I wanted to show you a cute little cake made with a tea light. The basic instructions are from SplitCoastStampers and I used Elegant Edges for the scallop circles and Martha Stewart Elegant Cake Art for the scallop border. The roses were made from scallop circles from Elegant Edges and then rolled with a quilling tool. Now, for the Make a Wish part. . .


One lucky follower of my blog, who leaves a comment on this post, will get to choose any cart they want from the Cricut Rewards Program and I will use my reward points to get the cart for them! That's right. . .any cart that is available on Cricut Rewards could be yours if you win this blog candy! I'll use random.org to choose a winner next Saturday, 8/20. So, follow my blog {if you aren't already} and leave a comment on this post and you might be the person making a wish! What cart do you think you would want?

Tuesday, August 9, 2011

Diaper Tricycle!


I'm sure you've seen the Diaper Cakes that everyone is making for baby showers and gifts. And while I love the diaper cakes, I wanted something a little different for a special friend who is expecting a baby girl. So, here is the Diaper Tricycle I made for her!


To make the Trike, I used a package of 50 diapers, two receiving blankets, two bibs, a pair of baby socks, a bottle, a baby washcloth, two diaper pins and some ribbon. Other items used were a toilet paper tube, a paper towel tube, rubber bands and some glue dots.


Start by dividing the diapers. I used 15 for each of the back tires and 20 for the front. Take the toilet paper tube and layer the diapers around it. Secure them with a rubber band.


Take the paper towel tube and repeat the process on one end. Wrap the washcloth around the tube and secure with a couple of rubber bands. Cover the rubber band holding the diapers together with ribbon and glue dots.


Wrap the other end with the remaining diapers. And cover the rubber band with ribbon.


Take one of the receiving blankets and roll lengthwise.

Thread the blanket through the paper towel tube and then through the toilet paper tube. Secure with the diaper pins.

Work the blanket back through the paper towel tube so the pins are hidden inside the tube. Roll the other receiving blanket lengthwise and thread it through the toilet paper tube. Place the bottle on top of the front diaper tire and bring the ends of the blanket straight up. Hold the blanket together by using a rubber band right above the bottle.


Add a bib to form the seat and the other bib to form the front fender. Bend the blanket ends down and back a little to resemble handlebars. Add a baby socks to each end of the blanket for the handlebar grips.


Add a bow around the rubber band on the handlebars and viola! You have a Diaper Tricycle!  So, what do you think?

Linking this post to:
http://www.tipjunkie.com/homemade-projects-88/
http://todayscreativeblog.net/
http://www.skiptomylou.org/?s=link&x=23&y=19
http://singingthreelittlebirds.blogspot.com/

Thursday, August 4, 2011

Baby Girl Dress Mini Album

I originally made this album over a year ago and it's still the project I get the most questions about! So I decided to give it it's own post instead of just a picture in the Project Gallery. I used shapes from Paper Doll Dress Up and Everyday Paper Dolls to make the dress shape I wanted. I cut several out of white cardstock and using Scotch Quick Dry Glue and flat lace, I covered the top of one dress. I then used ruffled lace to make the skirt portion of the dress. I glued another dress to the back and repeated the process for the back cover. The rest of the pages were covered with scrapbook papers. The pages were decorated with cuts from New Arrival, Wild Card, Mini Monograms and George.

Monday, April 25, 2011

More Water Bottle Bunnies

Had to make a few more with pretty Easter bonnets!


Tuesday, April 19, 2011

Bunny from Recycled Water Bottle

The challenge on the Cricut Circle Blog was to reuse, recycle or repurpose 3 items in your project along with 2 Cricut image cuts. This little bunny was created using an empty 8 oz water bottle, ribbon and flower from a tag on a gift basket, the button for the flower center was from an old shirt and the pompom tail was from some old trim from cafe curtains. The hat was made from 3 circles and a rectangle from George and Basic Shapes, the nose is a heart from Sweethearts and the bunny ears are from Paper Doll Dress Up.

Wednesday, March 30, 2011

2 Liter Teacher Appreciation Bottle and Welcome to my blog!

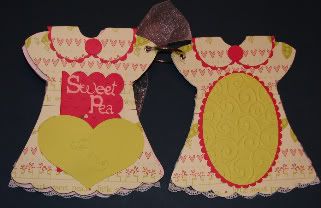
Welcome! Here is the place where I will share my crafty ideas and projects!

I thought I'd kick things off with a project I posted on the Cricut message board in March '09 that became wildly popular. Before the message board was switched to a new server, the 2 Liter Teacher Appreciation Gift Bottle thread had over 40,000 views and 38 pages of replies and posts of bottles others had created following the tutorial! It was so great to see everyone's "take" on the project.

Update: the old Cricut MB has been deactivated and all the links to it are now broken so I've removed the link.


So, how do you take all this and turn it into a great teacher gift? Easy! First, drink the soda! :)  If you don't like soda or don't like to drink it, you can get a bottle of a store brand {usually a dollar or so} and just pour it down the drain}.


Wash the bottle and let it dry and then remove the label.


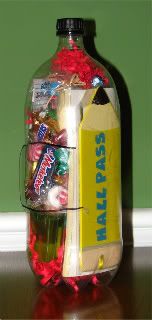
Carefully cut a U[shape "door" into the middle of the bottle. You can cut free hand or draw the shape on with a marker {it will be covered later}.


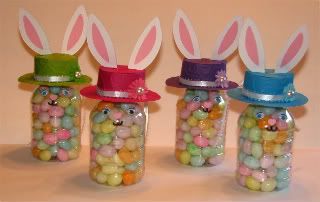
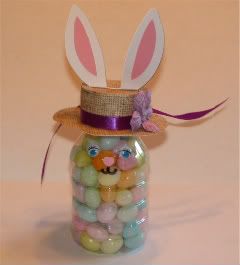
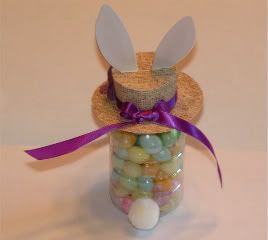
Now stuff all the "stuff" into the bottle.

Make a cute label from cardstock {I used the Loki-Cola font to print our label} and wrap it around the bottle to cover the secret "door" and tape it together. Add some ribbons and a Cricut cut and your gift is ready!

You can use a smaller or larger bottle depending on what items you want to put in it. And, you can make whatever theme you want. . .graduation {wouldn't some money and gift cards be cute?}, birthday {a stuffed animal or video game or other little gifts}, movie night {a movie, candy, microwave popcorn packs}, back to school {supplies like glue sticks and pens and marker}, Father's Day {a golf or barbque or whatever your dad is interested in} , Mother's Day {flowers and eye mask and manicure kit} and on and on!