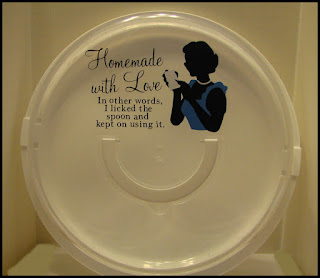
My daughter loves to bake and not only do we love that, but so do the people at her office! She often will bake just to try new recipes and take them into to her co-workers. She had been using left-over bakery containers. I found the somewhat elusive cake carriers at Dollar Tree and decided to get her one. But. . . it was so plain!
Never fear. . .a little vinyl and my Cricut Explore took care of that! I logged into Design Space and began searching for images. I found the {almost} perfect image on the Suburbia cart. It was a two layer design but with the slice feature, I was able to make the note pad more prominent. My daughter is a big list maker and always has a grocery list and notes with her recipes!
I also added the pearl necklace. . .just to make it a bit more retro! I found the saying on a kitchen towel set while surfing the net and it was perfect! I was able to use a circle the size of the top of the carrier and plan my design. The Explore cut the vinyl, including the small letters, without a problem. Then it was just a matter of weeding away the unwanted vinyl, using transfer tape and applying the design to the cake carrier.
My daughter loved it and her co-workers got a big kick out of it too! It's amazing what a little vinyl can do to a one dollar item!
Friday, June 5, 2015
Thursday, June 4, 2015
Black Pen Variety Pack from Cricut
A big request from Cricut Explore owners has been for good quality black pens to use with the writing feature. Cricut has releases a Variety Pack of black pens today! These packs have been popping up in various Michael's stores for the past weeks, but they have officially been launched on cricut.com today.
The package contains 5 black pens. Two fine point, one medium point and two calligraphy point pens.
The card sentiments from the Anna Griffin carts look great when written with the calligraphy pen!
And with the features of Design Space and the Explore, you can use multiple pens in one project. You can set some of the text to different colors and Design Space will prompt you to change the pen or you can pause your Explore as desired and change the pen. This example is from the Word Collage cart.
You can also use the pens to draw your images. These examples are from the Pretty Packages cart.
Overall, I found the pens to write/draw nicely and having a selection of different pen tips allows more creativity when using the pen feature. And of course, black pens tend to be the color ink I use the most, so having a pack of all black pens makes this a must-have for me!
The package contains 5 black pens. Two fine point, one medium point and two calligraphy point pens.
And here's a sample of the different pens writing the same sentiment.
The card sentiments from the Anna Griffin carts look great when written with the calligraphy pen!
And with the features of Design Space and the Explore, you can use multiple pens in one project. You can set some of the text to different colors and Design Space will prompt you to change the pen or you can pause your Explore as desired and change the pen. This example is from the Word Collage cart.
You can also use the pens to draw your images. These examples are from the Pretty Packages cart.
Overall, I found the pens to write/draw nicely and having a selection of different pen tips allows more creativity when using the pen feature. And of course, black pens tend to be the color ink I use the most, so having a pack of all black pens makes this a must-have for me!
Monday, June 1, 2015
New Design Space App for the iPhone!
Cricut has done it again! Today they have announced a new iphone app for Cricut Design Space will be coming soon! How exciting for those users who have an iphone!
The iphone app will look and function very similar to the ipad app. But there is one very exciting new feature. . .the use of the camera! You can create your design like usual and then use the camera to show your design on your project!
This is a screenshot of Narelle's design in the iphone app.
And this is how it would look on her wall! Yes, that's her actual wall! Imagine being able to see your design on your actual tile or pillow or tumbler or whatever!
Narelle has been beta testing the iphone app, so go check out her blog for more details!
http://www.thenoncraftycrafter.com/
But what if you don't have an iphone like me? No worries! Cricut has begun development of android apps for Design Space. I don't know when, but they are being developed!
So go forth and Cricut Everywhere!
Saturday, April 18, 2015
How to Make Design Space work after the Google Chrome Update
On Thursday, April16, Google Chrome started rolling out a new version update. This new version from Google has dropped your Design Space plugin. Here are a few quick and easy steps to check your version and restore the plugin.
1. Open Google Chrome.
2. In the upper right corner, click on the menu icon (it looks like three horizontal bars).
3. Choose “About Google Chrome” from the drop-down menu.
4. Check your version.
a. If it is version 42.0.2311.90, continue with step 5.
b. If your version is lower than 42.0.2311.90, wait for the update to complete then move on to step 5. (Make sure to “allow” if your computer gives you a prompt. You may also need to refresh your browser to see the update.)
5. Copy and paste chrome://flags/#enable-npapi into your address bar.
6. You will see “Enable NPAPI” highlighted. Click “enable”.
7. Now you are ready to go back to Design Space. You will be prompted to reload your plugin.
Thursday, April 2, 2015
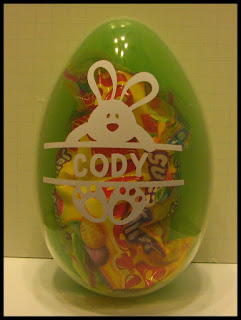
Personalized Plastic Eggs
Just a quick little vinyl project for my nephew for Easter! He loves having his name on anything and everything so it was fun to add this little bunny and his name. The image was made from shapes in the Cricut Image Library and it's cut from vinyl with my Cricut Explore.
He was thrilled when he got it. . .I'm not sure if it was because his name was on it or if it was the big bag of jelly beans in it!
Saturday, February 28, 2015
Special Hangers for a Special Bride on her Special Day!
The daughter of our long time friends is getting married! As a special gift for her and her Bridal Party, I decided to make special hangers for their dresses! The hangers came from Ikea and a bit of vinyl and my Cricut Explore and viola. . .
I used the Lavanderia Sturdy font for the name and Times New Roman font for the "titles".
So happy to be able to use my Cricut and create special touches for our special friends!
I used the Lavanderia Sturdy font for the name and Times New Roman font for the "titles".
And the Bride's dress hanging on her special hanger!
Wednesday, February 11, 2015
Cricut Design Space Update!
Cricut has been listening to it's customers and has been working on Design Space to improve the performance issues and enhance the search function. Here are some screenshots to show you what is different. {remember, you can click on the photo to make it larger}
The Landing Page has slightly larger photos and when you choose a Make It Now project, it will go to the Cut Preview screen, bypassing loading the project onto the canvas first. If you want to customize the project, you can still click the Customize button and the project will load onto the canvas for you to make changes to the design.
Once on the canvas, the layout is a little different. Most noticeably is the Options Panel on the right. You can collapse this panel by clicking the arrow along the scroll bar.
Example of the canvas with the Options Panel collapsed.
When you click on Add Image, you will notice a BIG difference! You have the option to make the images bigger. You can search by cart through an alphabetical list. And, you can search within a cart!
An example of the Upload Image screen with a little more info to help you choose the right upload option.
The Landing Page has slightly larger photos and when you choose a Make It Now project, it will go to the Cut Preview screen, bypassing loading the project onto the canvas first. If you want to customize the project, you can still click the Customize button and the project will load onto the canvas for you to make changes to the design.
Once on the canvas, the layout is a little different. Most noticeably is the Options Panel on the right. You can collapse this panel by clicking the arrow along the scroll bar.
Example of the canvas with the Options Panel collapsed.
When you click on Add Image, you will notice a BIG difference! You have the option to make the images bigger. You can search by cart through an alphabetical list. And, you can search within a cart!
This is where you change the sizeof the images.
This is where you search by cart.
This is where you search within a cart.
This is where I searched for "georgia" within the 50 States cart.
This shows the Filter Option for searches.
This shows when you search an image and select images to add to the canvas.
This shows how the images now look when added to the canvas and what the image handles now do.
This is an example of the Color Sync panel.
This is the new Cut Preview screen.
And yes, you can still drag and move an image on the Cut Preview mat!
An example of the Add Text feature.
An example of the Upload Image screen with a little more info to help you choose the right upload option.
And this is the pop box you get when you click your name on the canvas.
Overall, the performance is greatly improved. The search options are wonderful! And if all goes as planned, Cricut can start working on design features that we've all been wishing for in Design Space!
Want more info? Need help with your Explore or Design Space? Want to see what other Design Space users are talking about? Or what projects they are making? Then come join me on Facebook in
Subscribe to:
Posts (Atom)


