Saturday, December 13, 2014
Yourself the Elf!
The Cricut Design Team has a totally adorable print then cut project in the Make It Now section of Design Space! It's called Yourself the Elf and you can make "anyone" an elf by uploading their photo, sizing the head to fit the elf suit then printing from Design Space and letting the Explore do the cutting. One slight problem, the file does not contain the holes needed to assemble the Elf using brads. Not a big deal if you are making only one or two, but if you want to make your entire family into dancing elves or maybe your child's entire class, you don't want to hand punch all those holes. I added them to the file so your Explore can cut them for you!
If you want my file with the holes added, just be a follower of my blog and leave a comment on this post with your email address and I'll send you the file. Remember, even though you can open the file, you will still need to purchase the MIN project {if it's not still included in the subscription or if you don't have the subscription but it's only 99 cents} to be able to cut it!
Cricut has now updated the project and added the holes to the files! Click this link for the updated file: Yourself the Elf with added holes for easy assembly
Win a Cricut Explore!
Yes, that's right! You can win a Cricut Explore! You've heard me talk about it. You've seen my projects using it. And now, you can win one! Entering is easy ~ answer a simple question, follow my blog {if you're already a follower THANK YOU!}, visit Narelle's blog and find a secret word {hint. . .look to the right on her blog but don't tell her I told you!} and fill in the Rafflecopter gadget! That's it! In 6 days, someone will win a brand new Explore!
a Rafflecopter giveaway
Tuesday, December 2, 2014
Olaf + Warm Hugs + K Cup box!
Here's another version of the 2 K Cup box that I designed in Design Space {and am sharing the box file for Free in my facebook group Cricut Lovers Guide To Design Space }. For this box, I cut then folded all the score lines and then embossed the box using my Cuttlebug and snowflakes folder. I used the circles that cut out of the box for the K Cups and backed them with a slightly larger white circle fro the tops of the K cups. Then I used two Olaf images from the Frozen cart and the print then cut feature of the Explore. The phrase "warm hugs" is also from the Frozen cart.
Wednesday, November 26, 2014
Disney's Frozen Meets Cricut's Design Space
The biggest news to hit the Cricut world since the Explore was released has just been announced! Cricut has a brand new image set based on the Disney movie Frozen! These images have been released in Design Space, the powerful software that runs the Cricut Explore. While they are currently exclusive to Design Space, they will be released in 2015 as a physical cartridge and added to Cricut Craft Room! Through Design Space, you can buy the cart or you can buy single images. There are 111 images and you can see them all in Design Space! Just search Frozen.
If you don't have an Explore yet, now is the perfect time to buy one since there are so many great deals for Black Friday!
Come join us over in Cricut Lovers Guide to Design Space for all the latest info!
Friday, November 21, 2014
Free File Friday ~ 2 K-Cup Box
It's Free File Friday over in my facebook group, Cricut Lovers Guide to Design Space! And today's free file is a cute little box that will hold 2 K-Cups. This would be a perfect little gift for co-workers or added to a gift basket for an extra special gift.
The box file was designed in Cricut Design Space using shapes from the free image set, Craft Room Basics. That means any Design Space user can cut this file! The cute little turkey is from Omar Toro's awesomesvgs.blogspot.com and he shares it for free! He designed the little turkey as an adorable place card holder for your Thanksgiving table. But I used the Print then Cut feature on the Explore and added it to the box front.
To get the box file, go join Cricut Lovers Guide to Design Space group! It's free to all the members! There are lots of free files, project sharing, inspiration, tips, tricks and troubleshooting for your Explore and Design Space.
Assembly Instructions:
The file will cut and score. Just fold along the score lines and use a bone folder to make them crisp. Use a little caution when folding along the edge of the circles. I placed the box on my desk and used the edge of the desk to start those folds. Your box should look like this:
Now lay your box, with the inside on your work table and apply your adhesive to the long edge {on the right and marked in black in the next photo} and the two outer flaps on each side {marked in black}. Turn the box over and carefully add adhesive to the center flap on each side {marked in red in the photo}. I embossed the box in the photo using an Anna Griffin embossing folder.
{For less "bulk" when assembled, I used my scissors and snipped the flaps along the long edge. I will adjust the file and remove those sections if I can save and reopen after using the Slice feature.}
Then, push the center flap out of the way and line up and adhere the other two flaps on one side. Your box should look like this:
Then repeat on the other side.
Now fold the remaining flaps up and adhere them to the sides.
Now push the remaining flaps inward and fold the box down onto the back. Reach into the holes and make sure the edges are firmly adhered.
That's it. . .except for the embellishments! For this box, I used the Print then Cut feature with my Explore and the gorgeous Anna Griffin Vintage Floral printables. And they were perfect!
Saturday, November 8, 2014
All Aboard the Peppermint Express!
Elf added!
The Santa Train card gave me so many ideas for the Stacked Blocks card base! Here's the Peppermint Express! Only, he doesn't have a conductor. I just couldn't decide what image to put in the window so I attached it with temporary adhesive and will stare at it a while! What/who do you think should be "in" the window? I thought about the Candy Boy from the My Community cart but wasn't thrilled with that idea.
So the elf got an overwhelming recommendation on Facebook, so I added my favorite one from the Jolly Holidays cart!
The Stacked Blocks card base was designed in Cricut Design Space using images from Craft Room Basics. The file is free to members of my Facebook group, Cricut Lovers Guide to Design Space. The candies an bow are from Cricut carts as well.
Come join me on Facebook! And tell me here or there just who should be driving the Peppermint Express!
Friday, November 7, 2014
Santa Train Card from the Stacked Blocks Card Base!
Hop aboard Santa's Train! This is made from the Stacked Blocks card base and I cut it in dark green. I used the wheels from the train on the B is for Boy cart. The wreath is from the Christmas cart. Santa is from A Quilted Christmas and I made him into a Print then Cut. I also used the slice feature in Design Space to remove the lower half of his body{!}. Other shapes came from Craft Room Basics.
The two patterned papers, the red is a polka dot print and the green is a snowflake print, came from my favorite paper designer, Anna Griffin.
I gained inspiration from a Valentine Train card by Chris that I came across while trying to determine the "official" name of this type card. If you want the base file for the stacked blocks card, it's the Free File Friday over in my facebook group, Cricut Lovers Guide to Design Space! Come join!
Free File Friday ~ Stacked Blocks Card Base!
It's Free File Friday in Cricut Lovers Guide to Design Space on Facebook! Today's free file is the stacked blocks card base! Some have called it a Stair Step card but there are so many "step" card types and this one resembles stacked blocks, so that's what I'm calling it. It's a great card that folds flat to mail and then stands as a decoration!
The card base:
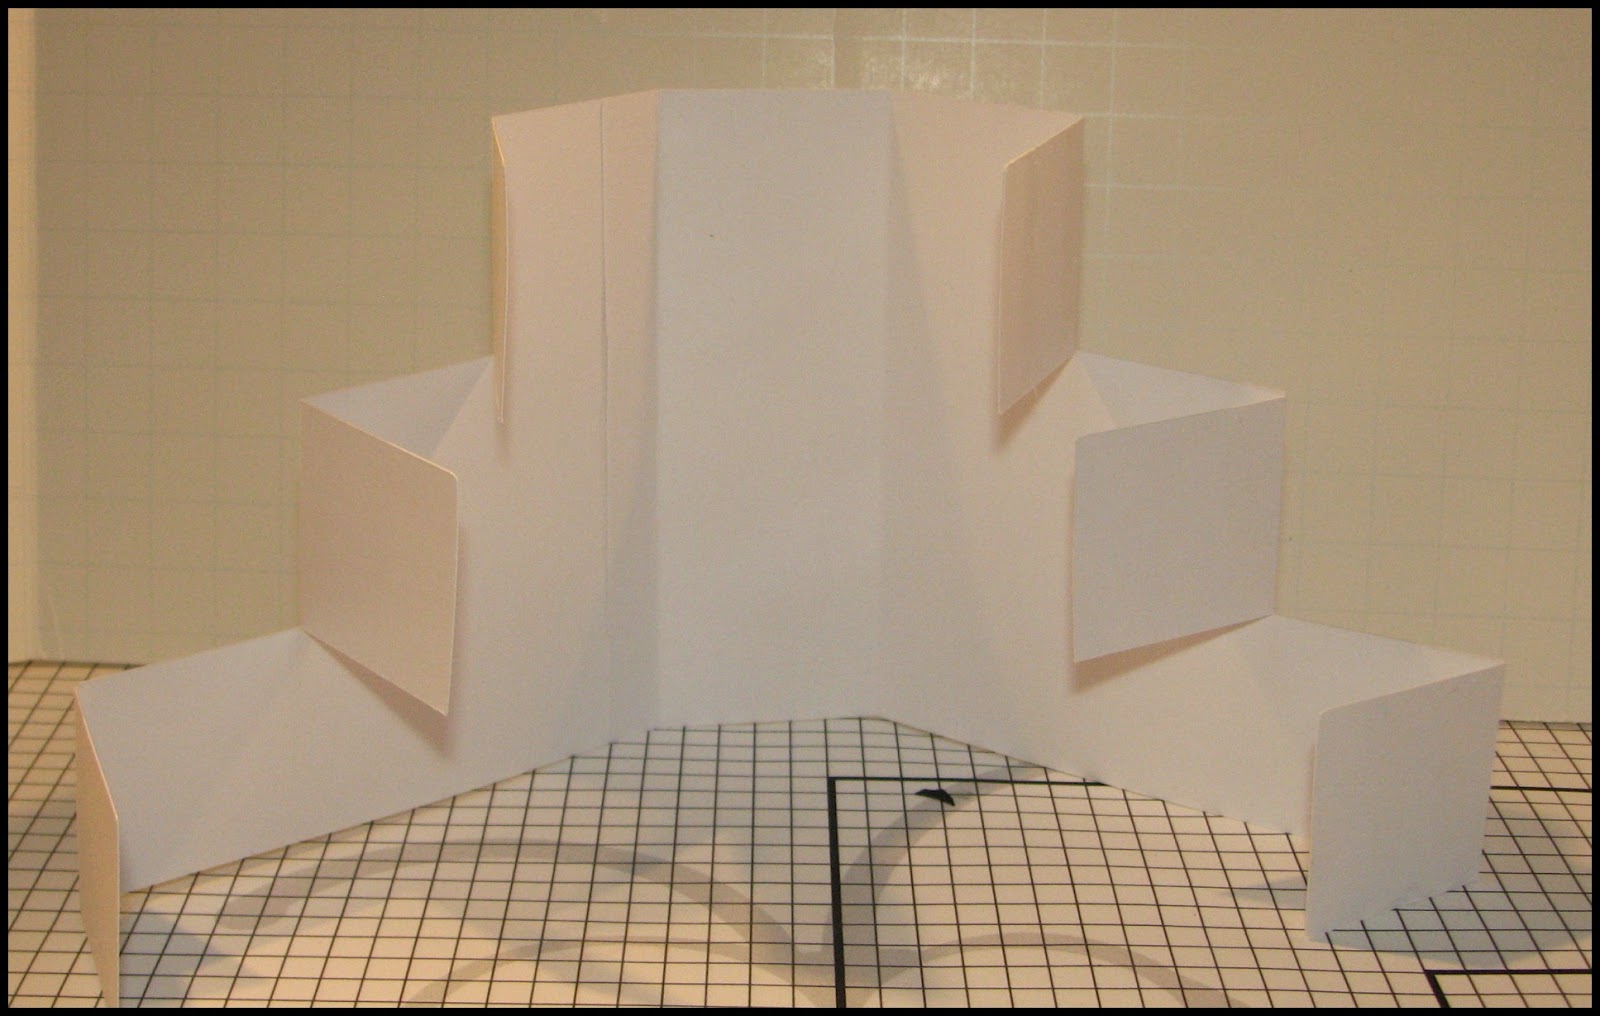
The base cuts in two pieces because the Explore can only cut 11.5 inches on the standard 12 x 12 mat. You could always use the longer 12 x 24 mat or make the design slightly smaller. This is what the two pieces will look like once you have cut and scored them.
When you stand them up, you can see how they will go together. This is a good time to make sure you have your design {if you are using a patterned paper for the base} the way you want it to be facing.
Now, decide which way you want your card to face. Since you will be gluing the tops flaps of each "block", determining the direction you want your card to face will allow you to have a more finished look on the edges by gluing the flap that folds toward the back on top of the other flap.
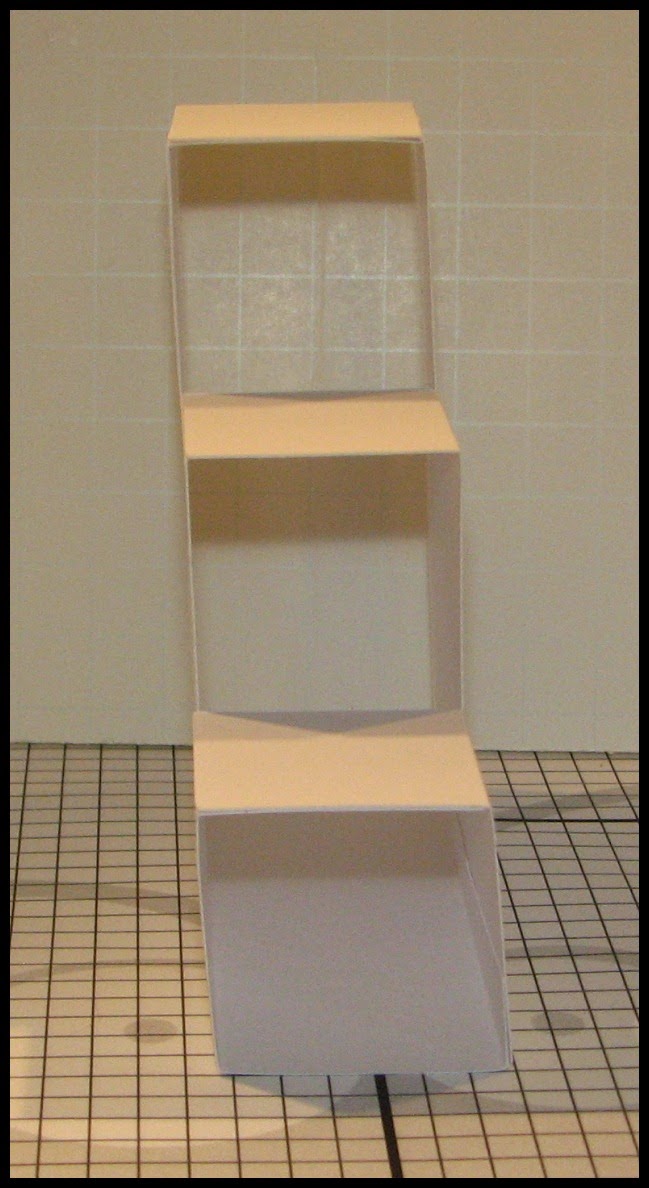
This is what the card will look like from the side.
And this is how the card "flattens" to fit inside your envelope.
The file also includes the squares to embellish the sides. This FREE file is available in the Cricut Lovers Guide to Design Space group on Facebook. Come join us and get this file as well as many others and lots of tips and tricks and inspiration!
The card base:
The base cuts in two pieces because the Explore can only cut 11.5 inches on the standard 12 x 12 mat. You could always use the longer 12 x 24 mat or make the design slightly smaller. This is what the two pieces will look like once you have cut and scored them.
When you stand them up, you can see how they will go together. This is a good time to make sure you have your design {if you are using a patterned paper for the base} the way you want it to be facing.
Start by gluing the thin edge of the piece on the left to the inside of the piece on the right. This will make your "seam" hidden inside the card. Your card base should look like this. {If you click on the photo, it will enlarge and then you can easily see the "seam" on the left.}
Now, decide which way you want your card to face. Since you will be gluing the tops flaps of each "block", determining the direction you want your card to face will allow you to have a more finished look on the edges by gluing the flap that folds toward the back on top of the other flap.
This is what the card will look like from the side.
And this is how the card "flattens" to fit inside your envelope.
The file also includes the squares to embellish the sides. This FREE file is available in the Cricut Lovers Guide to Design Space group on Facebook. Come join us and get this file as well as many others and lots of tips and tricks and inspiration!
Tuesday, October 28, 2014
How to Size Your Envelope to Fit Your Card in Design Space!
In my Cricut Lovers Guide to Design Space group, we've gotten several questions about sizing envelopes to fit cards. Of course, the easiest way is to load your card and envelope onto the Design Space canvas and resize them both at the same time. But if you've made a card and now want an envelope to for it, here's a little tutorial on how to make the envelope fit your card. You just need to know the size of your card and find an envelope in your images in Design Space! {click on the photo to enlarge it so you can read it!}
Monday, October 27, 2014
Swirly Snowman from Kraftgineer Studios!
As soon as I saw this Swirly Snowman, designed by Kraftgineer Studios, I knew I had to have him! I had picked up a little red cutting board from the Dollar Tree and thought he would be great to decorate it. The svg file cut beautifully with my Cricut Explore. Weeding was a little tedious on the hat but the rest of the image weeded easily. And the results were beautiful!
I added a few snowflakes from one of my Cricut carts. Since this is for decorative purposes, I think I might add a little bling to the center of some of the snowflakes and top it off with a big bow on the handle!
If you'd like the design for yourself, look for Kraftgineer Studios on facebook!
I added a few snowflakes from one of my Cricut carts. Since this is for decorative purposes, I think I might add a little bling to the center of some of the snowflakes and top it off with a big bow on the handle!
If you'd like the design for yourself, look for Kraftgineer Studios on facebook!
Wednesday, October 15, 2014
Christmas Thank You Cards
A teacher friend wanted some Thank You cards for her students who will be giving her gifts for the holidays. She likes to write the notes and send them home with the students. The Present Card from the Anna Griffin Christmas Kitsch cart was perfect! I sized the cards to be 3 x 3 inches in Design Space and they cut beautifully. All of the little tiny circles were perfectly round. I did use the Hide Contour feature in Design Space to hide the circles and for those cards, I used the liner on the outside! Here are a few and I'll be making more of them before the holidays arrive!
Wednesday, September 24, 2014
Cricut Explore Print then Cut ~ Released!
Last night, the long awaited much anticipated Print then Cut feature in Design Space for the Cricut Explore was released! And to help you learn to use it, here are some very good videos from Cricut!
Print then Cut Basics
Print then Cut Advanced
Print then Cut Basics
Print then Cut Advanced
Friday, September 19, 2014
Using Imagine Carts in Cricut Design Space
There have been so many questions and differing answers on using the Imagine carts in Design Space. So I made this handy dandy flow chart based on the information I verified with Provo Craft. Hope this helps clear up the confusion!
Wednesday, September 17, 2014
Card Matching Game with Print then Cut
Surprise! I made a project for a little boy! Usually my projects are geared toward girls. This project could easily be changed to a girl project or a unisex project just by changing the images and paper used.
There are 18 cards and two of each picture so you can use them as a matching game or a memory game. The images are from Boys Will Be Boys. I used a rounded corner square from Craft Room Basics, sized it to 2.5 x 2.5 inches and set the color to white. I then sized the cars and trucks and rocket and helicopter to fit inside the square. I selected the squares and images {6 of them at a time} and Flatten them. I pressed GO, then Print and Continue and printed the page on my home printer. I then loaded that page onto my mat and into my Explore and it cut the cards. I used a patterned cardstock with white on the back side. That is the side I printed the cards on. Easy peasy!
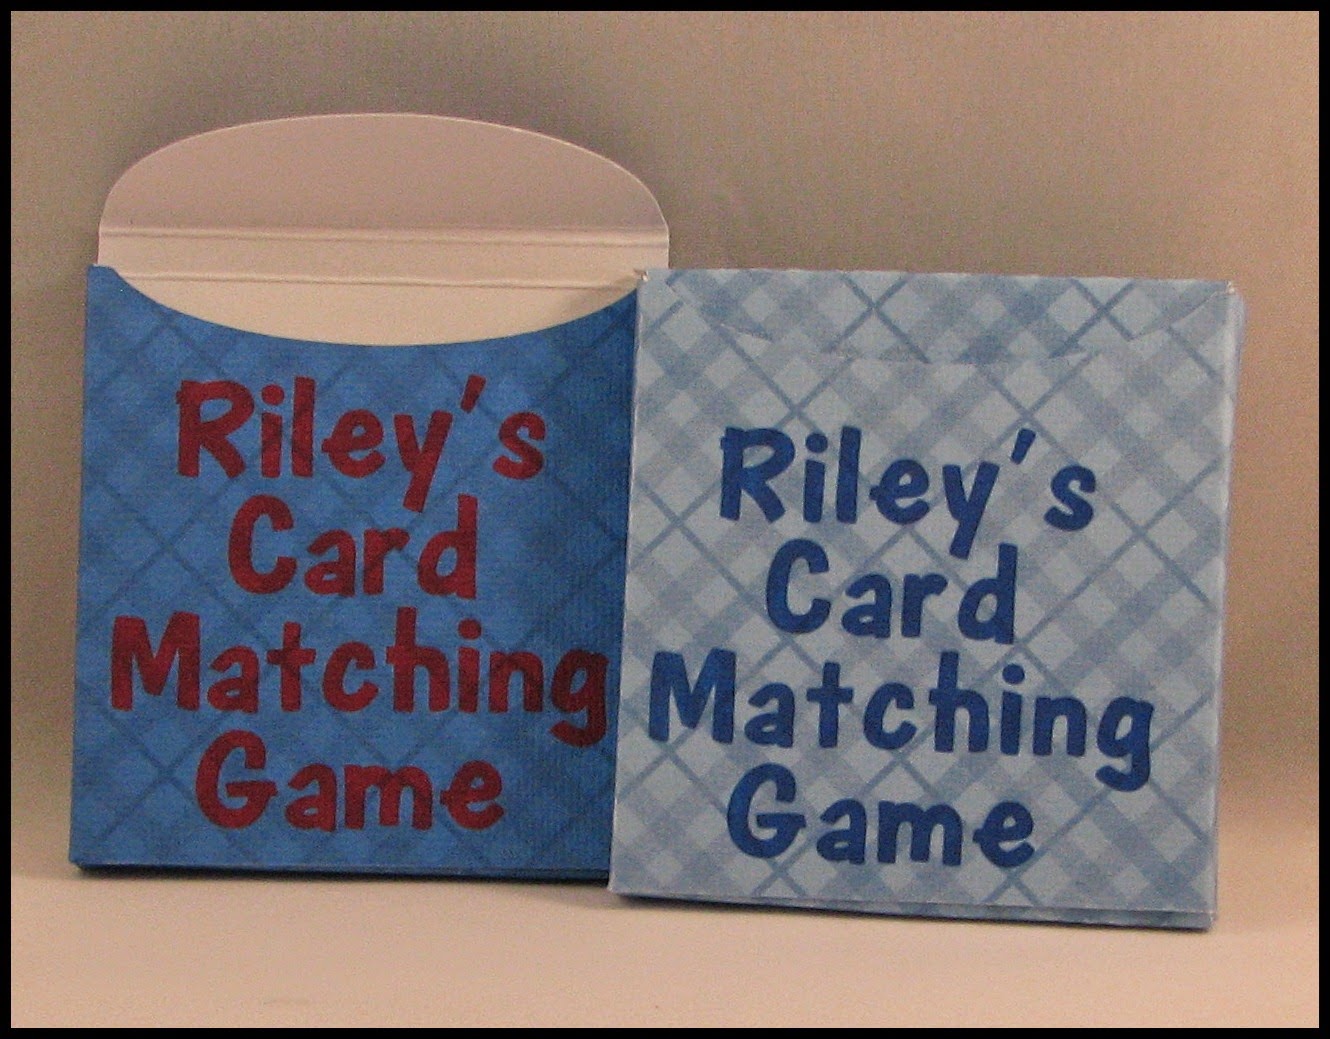
Of course, I wanted a box for the cards. And I wanted to personalize it. And I wanted it to coordinate with the cards. They say you need to print on white paper only but back when I had a different cutter that had the Print and Cut option, I learned a little trick. Use white stickers where the registration marks will print! Hoping it would work with the Explore, I dug out some stickers.
I used these Avery 1 inch x 3 inch stickers and cut them in half and placed them on my pattern paper before loading it into my printer. On the Preview Mat, you will see where the registration marks will print for your image. I set up my design using the crayon box from Tags, Bags, Boxes and More and the marker font from the Pooh and Friends cart. I set the box color to light blue and the font to red. I loaded the paper in the printer and. . .
Voilà! My paper printed with the image and registration marks.
And it cut!
But, I decided I didn't like the red font, nor did I like the additional layer of blue. I was going for a slight difference and it was too dark for my taste. So I changed the box color to white, place stickers on another piece of patterned paper and Printed and Cut again. You can see the difference below.
I'm pleased with the second box {even though the text is slightly off center and that's because I only "eyeballed" the placement. I hope there is a center or align feature in future updates.}.
Monday, September 15, 2014
Free Access to the Imagine Art Cart Library for Imagine Owners!
If you own an Imagine and have it registered in your cricut.com account, you should be receiving this email!
To whom it may concern,
You are receiving this email because we have record that you are a Cricut Imagine owner. Very soon, we will be releasing the Print then Cut feature for Cricut Design Space™, the online software used exclusively with Cricut Explore® machines. Even if you're not yet a Cricut Explore owner, you'll want to read on for exciting news.
As a Cricut Imagine owner, with the launch of the Print then Cut feature, your Cricut.com account will be granted free digital access to all Cricut Imagine Art Cartridges (even those you haven't purchased!) in Cricut Design Space for use with the Cricut Explore machine, whether you have one now or purchase one in the future.
Because you are receiving this email, no further action is required—the images will be loaded to your account. We want to make sure everyone who is eligible for this offer receives it, so we need your help in spreading the word to anyone who owns a Cricut Imagine but did not receive this email. If you know someone who has a Cricut Imagine, please ask them if they heard the great news. If they didn't receive this email, they can still get free digital access—they just need to contact customer service at imagineowners@cricut.com with the serial number of their Cricut Imagine machine and the email they use to log into Cricut.com. Customer service will then update their Cricut.com accounts to give them full access to all the Cricut Imagine Art Cartridges. Whether or not they own a Cricut Explore machine, they'll need to claim this offer by December 31, 2014, so that the images will be linked to their account if and when they upgrade their machine.
You will also be granted access to Cricut Imagine Colors & Patterns cartridges in a future release of Print then Cut. Once again, we thank you for being a loyal Cricut customer.
Happy crafting,
The Cricut Support Team
877-7CRICUT
support@cricut.com
877-7CRICUT
support@cricut.com
The Big News! Print then Cut and Slice and maybe more!
Today, Cricut has a big announcement! The Print then Cut feature for the Explore is going through the final stages of beta testing and will be released the week of September 22 to all Design Space users! At that time, all you will need to do is to update your plug in and then update your firmware and once you are ready to print then cut, calibrate your Explore to your printer. They are some other enhancements but first let's talk Print then Cut!
As many speculated, you will pull your design up on the screen in Design Space. Send it to your printer and load that into your Explore.
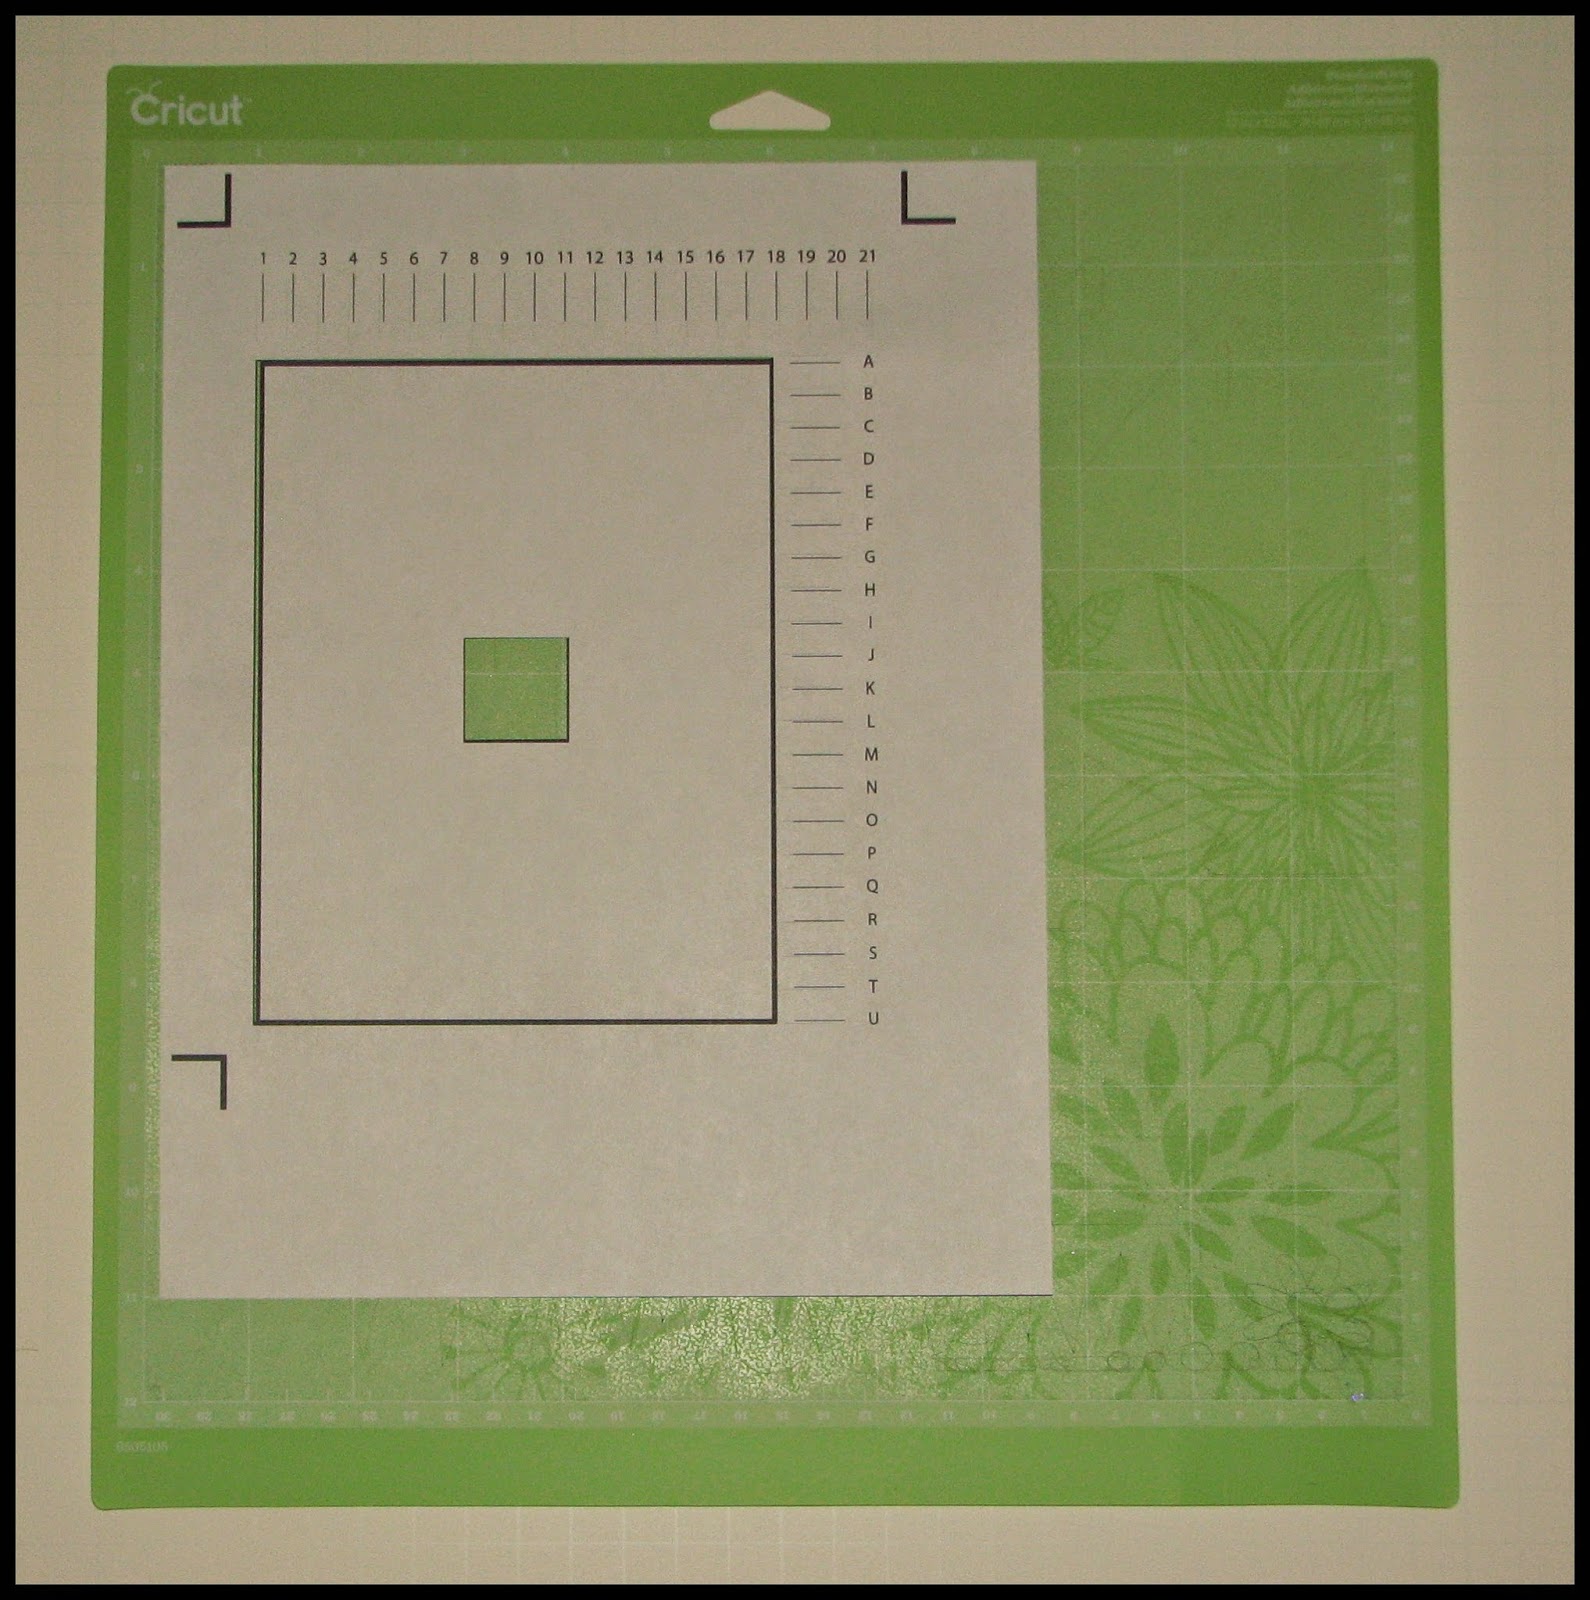
So how will this work? The first time you "flatten" an image and go to the Preview Screen, you will be prompted to calibrate your Explore to your printer. You print the calibration page, load it on the mat and follow the onscreen instructions.
This is what the calibration page looks like. It will first cut the small square and ask you about the cut. Do not remove the mat during the calibration process. {remember you can click on the photos to make them larger}
If the cut is good, it will then cut the lines across the top and down the right side and ask you which lines {one from the top, one from the right} is the most centered on the line.
If those cuts are good, it will then cut the large square and ask about the quality of that cut.
So once you are calibrated, and you only need to calibrate once unless you have a problem, you place your image on the canvas. While it is selected, press Flatten and then GO.
The Preview Screen will show the image with registration marks and a Print and Continue option.
Take your printed page, load it to your mat and the Explore will cut it out!
Place it over {or behind} the shape you want to slice, putting the edge of the square where you want to cut it.
Select both images and click Slice.
Through the magic of Cricut, Design Space will now give you three shapes that you can use as individual images!
As many speculated, you will pull your design up on the screen in Design Space. Send it to your printer and load that into your Explore.
So how will this work? The first time you "flatten" an image and go to the Preview Screen, you will be prompted to calibrate your Explore to your printer. You print the calibration page, load it on the mat and follow the onscreen instructions.
This is what the calibration page looks like. It will first cut the small square and ask you about the cut. Do not remove the mat during the calibration process. {remember you can click on the photos to make them larger}
So once you are calibrated, and you only need to calibrate once unless you have a problem, you place your image on the canvas. While it is selected, press Flatten and then GO.
The Preview Screen will show the image with registration marks and a Print and Continue option.
Take your printed page, load it to your mat and the Explore will cut it out!
I think I will take this little frog and make a sticker out of him by running him through my Xyron! but wait. . .what was I thinking? Cricut has new 8.5 by 11 sticker sheets and printable vinyl sheets!
The feature that I think is even more amazing than Print then Cut {and the one I thought would surprise people} is the Slice feature! Oh My Goodness, this is going to change the way we design and cut! With the Slice feature, you can take an image and "cut" part of it away! And not like the sometimes tedious method of hiding each line! More like a cookie cutter!
Say you only need half of a shape. . .a heart, circle or whatever. Take another shape {I like using a square}.
Place it over {or behind} the shape you want to slice, putting the edge of the square where you want to cut it.
Through the magic of Cricut, Design Space will now give you three shapes that you can use as individual images!
This means you can create within Design Space pretty much any image you need for your project! And it means that you can take oversized projects and Slice them into different images for cutting! So much better than the old "hanging an image off the mat" with the Gypsy and Design Studio programs.
There may be more to Cricut's Big news, but that's all I know as I am typing this before the announcement. Check back for projects and tutorials using these new features and any other "news" that Cricut tells us in their announcement!
And, I'll be online in the Cricut Lovers Guide to Design Space facebook group to answer any questions you might have! If you aren't already a member, come join!
Subscribe to:
Comments (Atom)


.JPG)


