Friday, December 9, 2011

Sophie Circle Magazine Contest

Each month, the Circle Magazine hosts a contest for Circle Members. This month, the contest is based on the images from the Sophie cart. The rules were to use the exclusive Sophie cart to create something fabulous for the upcoming holiday. The project needed to use at least 3 images from the Sophie cart.

I decided to use the background shapes as the base for the numbers on my advent calendar. I first use CCR to create a little gusset pocket with the Craft Room Basics cart and the George cart. I cut 24 out of a metallic holly paper, scored, folded and glued them to the base (which was also the metallic holly paper). I then chose 4 different background images from Sophie and I cut 3 of each image in red and 3 of each in green. I glued those to the pockets. I used Nursery Rhymes for the numbers and glued those to the pockets. I added a couple of red bows and viola! My advent calendar was ready to fill with little goodies for each day.

This is how it looks partially filled. My nephew volunteered to eat the candy for the first 9 days!
And this is a view looking down into the pockets.

Saturday, December 3, 2011

Santa's Magic Key

Welcome to the Sophie Cartridge Blog Hop hosted by Michele. We wanted to share some of the really nice images from the Sophie cart. If you just happened upon my blog and want to start at the beginning of the hop, go to Michele's blog. If you're already hopping along, you should have arrived here from Liz's Bog.

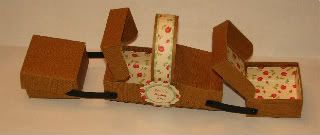
My project for the hop is. . . a Santa's Magic Key hanging. In case you don't know, there is a legend that Santa's magic can make an ordinary key open your door. This is great for children who live in homes without a chimney. But, it also works for children who do have a chimney but want to make it easier for Santa to get into their house with all those presents!

{you can click on the photo to make it a little larger}

I first searched for Santa Magic Key poems and when I couldn't find one I liked, I took the parts I did like and added some to create my own version. I printed it on ivory cardstock and cut it out using the frame background and CCR. I printed the image off center so I could hang the key and not block the words. Here's the poem I used. You can use it too, or make your own.


Santa's
Magic Key

It's the night before Christmas and we're excited as can be!
We're leaving this key
so you won't have to squeeze down the chimney.
Your magic makes the key fit right
and you can come in the door tonight.
Thank you Santa, for the presents you will leave by the tree,
And don't forget. . . the milk and cookies are on me!


I then cut the frame and glued it to the wording. I cut the key 5 times, 3 in gold cardstock and 2 in gold glitter cardstock (flipping the key image to get a front and back). I glued all those layers together and tied a ribbon. To hang the key, I punched a hole for a brad and when closing the brad, I left a little room between the brad head and the paper. That gave me enough space to slip the ribbon on and off the brad.


I then hid the interior lines of the frame in CCR and cut another frame in red. This one, I glued to the back.

I hope you like my Santa's Magic Key project and thanks for visiting my blog! Your next stop on the hop is Megan. Before you go, if you would like a chance to win this project, become a follower of my blog and leave me a comment stating you want a chance to win. I will randomly choose one person and send Santa's Magic Key to them!

Friday, December 2, 2011

Acetate Santa Tag


This little tag was actually a happy accident! I was stamping the Santa image on recycled plastic from the clamshell of a Cricut cartridge and then it wasn't flexible enough for the project I had in mind. So I created a frame in CricutCraftRoom and viola. . .it became a tag! You can't tell in the photo, but the part with the Santa image is actually clear {there is white paper behind it in the photo} and when the tag moves, you can see the image of Santa watching you! So you better be good, for goodness sake!  :)

Thursday, December 1, 2011

Christmas is Coming!

Since the wreath that hangs over our mantel at Christmas time has seen better days, I decided to replace it with a  frame. I used glittered paper and what was suppose to be a window decal of Santa inside the frame and vinyl lettering outside the frame. I can't wait to hang it with the stockings and garland on the fireplace!


{And, I see I need to straighten the word Magic before it goes up! Note to self~buy some CLEAR transfer tape!}

Here's a "corrected" project photo. It looks so much better with the word Magic straight!  :)

Wednesday, November 30, 2011

Sophie Blog Hop this Saturday!

Be sure to join in on the Sophie blog Hop {featuring projects using the Circle Exclusive cart named Sophie} hosted by Michele.


Winner from the Me and Mickey Blog Hop

Congratulations to the winner of the envelope full of Disney stickers and embellishments! And the winner is. . .gramjak! Send me an email (scrapalette@gmail.com) with your mailing address and I'll get the envelope mailed off to you!

Congratulations and thanks to everyone who visited my blog! :)

Tuesday, November 22, 2011

Paper Bag Turkey

A few years back, Family Fun had a cute Thanksgiving project using a brown paper grocery bag as the body of a turkey and it was filled with popcorn for munching. Well, that took a lot of popcorn to fill that grocery bag and no one really wanted popcorn before our Thanksgiving meal. So last year when I found some little silver trays at the Dollar Tree, I decided to make a smaller version and fill it with candy, for after dinner.

The body is a lunch bag and the legs are two small "parts" bags from Ace hardware (I just turned them inside out to hide the markings). The paper frill for the legs was cut using George and Basic Shapes, the leafy greens for the platter is a leaf from Pooh and Friends and the carrot curls are paper strips rolled with a quilling tool.


Pin It

Monday, November 21, 2011

Tepee Card and Treat Box~All in One!


Here is a little tepee that I designed in Cricut Craft Room, using George and Basic Shapes, based on a pizza box design. The little Indian girl is made using Paper Doll Dress Up.

 I wanted it to open so I could add a sentiment in it. Once it was completed, I realized I could also add a few treats!
 These will decorate the table on Thanksgiving but I'm also seeing that triangle "pizza" box as a tree. . .maybe a Christmas tree!  :)

Pin It

Saturday, November 19, 2011

Mickey Treat Box

Hello and Welcome to the Me and Mickey's Birthday Blog Hop! You should have come to my blog from Rexann, the birthday girl. If you didn't and want to start at the beginning of the hop, head to Michele's Blog. Today we are celebrating Rexann's birthday (which is today) and Mickey Mouse's birthday (which was yesterday)!

So, HAPPY BIRTHDAY REXANN AND MICKEY!!!

My project to help celebrate is a little Mickey Treat Box! I made this using the Mickey and Friends cart. It's cute enough as it is,


but it's even cuter when you open it and see the candy inside!


I cut 3/4 inch circles and the Mickey glove and glued them to Hershey's Kisses! Yummy!  And, once the candy is gone, you can fill the box with paper clips or Disney memorabilia or whatever you want! And, just so Mickey doesn't get lonely,


there's a Minnie Mouse box too! And, of course, her box is also filled with candy,


some "dressed up" Hershey's Nuggets!

I hope you have a wonderful birthday Rexann! The next stop on the hop is Laura. Before you go, become a follower of my blog (if you aren't already) and leave a comment telling of your favorite birthday memory and one lucky person will win an envelope filled with Disney embellishments and stickers! 

Thanks for stopping by!  :)

Pin It

Friday, November 18, 2011

Me and Mickey Blog Hop Tomorrow

You're invited to join us for a Me and Mickey Blog Hop on November 19 to celebrate Mickey and Rexann's birthday! The hop will start at Michele Green's blog and I'm stop number 6! I hope you'll hop on by tomorrow!

Catching Up!

Wow! Things have sure been busy for me these past few weeks. I've been creating and will hopefully get some new projects posted soon. But for now, I need to announce the winner of the Gingerbread Cart from the Winter/Christmas Blog Hop. So without further ado. . .Congratulations to Penny! Your comment was chosen using random.org. Please send me your mailing address to scrapalette@gmail.com and I'll send your cart out!

Thanks to everyone who stopped by during the hop!

Saturday, November 5, 2011

Christmas Tree Tea Light


I am so excited to be hosting a Winter/Christmas themed Blog Hop today! Nineteen other creative crafters have a winter or Christmas themed project {some blogs have both} created for you! So sit back, relax and start hopping!

My first project for the hop is a Christmas Tree Tea Light Holder {you know I love those little battery operated tea lights}!  Today's post will have the photos and there will be a tutorial and cut file added in a day or two. Sorry I didn't have time to get it ready with all my prep for the South Carolina Circle Meet Up.

I used CCR and the George cart to create a four-sided triangle box. Then I layered on each side, the swirly tree from the Christmas Solutions cart.  Glued the tree to a scalloped square from Mini Monograms that I had added a circle cutout in the center. Glued that to the shirt box, that also has a circle cutout, from Tags, Bags, Boxes and more. And added a star from George.


I used the shirt box not only for the base, but also for access to a battery operated tea light!

Once the tea light is turned on, close the box and you have a beautiful, glowing decoration or gift!


The other project I have today is a cute little gingerbread man, ready for winter! The gingerbread man is from Paper Doll Dress Up, his hat is from Everyday Paper Dolls and his scarf is from Winter Woodland.


But, there's not just one. . .they are 50 of him! This is only half of the group.I made these for a tag swap. I do still need to add the ribbon hanger.


Blog Candy!!!
Before you head to the next blog, become a follwer of my blog {if you aren't already} and leave a comment for a chance to win a Gingerbread Seasonal cart!

Here's the blog hop list:


1. Paulette at  http://scrapalette.blogspot.com/  <<<START
2. Debbie at  http://bugginattheseams.blogspot.com/  <<<Next stop
8. Michele at  http://www.michelegreen.com/ 


Pin It

Thursday, November 3, 2011

A Few More Halloween Projects

Here are a couple of Halloween projects I never posted.

A set of decorative blocks {made from the file I created for the FALL set} with Halloween images/words on each side. My family had a lot of fun rearranging these!


And a single and triple test tube candy holder! Even the teenagers were impressed with these!


Be sure to come back on Saturday for the Winter/Christmas Blog Hop! I'll have a couple of new projects to share.

Sunday, October 30, 2011

Candy Holders

Here are two candy holders I made for Halloween. The candy corn holder was quick and easy with an image from the Pumpkin Carvings cart cut from vinyl and then applied to the glass jar. The eyeball candy holder is a candlestick glued to a Mason Jelly Jar. Chris made everyone at the Woodstock SWARM one {aptly named a Redneck Wine Glass} and I've been scouring thrift stores for candlesticks ever since. The jelly jars came from Walmart.

Ribbon Bat

Here is an invitation (party info is on the back) for a Halloween party with a cute little ribbon bat. To make the bat, you punch 2 holes close together and thread the ribbon through them, cross it in the back and back through the holes to the front. Then just add some googly eyes!

Friday, October 28, 2011

Quick and Easy for Halloween

I used Plantin Schoolbook and Pumpkin Carvings to make the treat bag.


And it holds quit a bit of candy.


The lighted eyeball is a project from a back issue of Family Fun. It's a ping pong ball with a hole in the bottom and placed over a batter operated tea light. Add vinyl cutouts for the eyeball.

Thursday, October 27, 2011

My Cricut "Bughead" Organizer

What to do with all those Cricut markers and extra blades? Keep them in a Cricut Bughead Organizer! This one is made from 2 bowls, 2 small wood candle holders, a wood bead, some wire, 2 small wood beads and some customized googly eyes!


I made one for a Hostess Gift for my friend Stephanie when she hosted the most awesome Woodstock SWARM. I also made these little treat containers for all the Cricuteers who came over to my crop area on Saturday morning. They are those plastic condiment cups with bugheads cut from Cricut green vinyl and filled with M&Ms.


While looking through some old supplies for some wire for the bughead antenna , I came across these cans that I painted for a craft fair  quite a few years ago. They are empty pineapple cans and I used acrylic craft paint. My father-in-law named them "Pump-Cans"!


Pin It

Witch Shoe

After seeing a witch shoe that Doxie Mel had posted for a challenge on the Cricut Circle blog, I knew I needed to make something similar for my daughter and her college roommates. So, using the Princess Party cart and Design Studio, I added some shapes from George and make the Princess shoe a Witch shoe.


I used mint Oreos to fill them and needless to say, the my daughter loved them and can't wait to give them to her friends! Thanks Doxie Mel for the inspiration!  :)

Pin It

Coming out of Cybernation!

My poor, neglected blog is awakening! Although I haven't posted, I have been creating. So let's start by catching up!

First, I took a trip to Orlando to meet a friend from the Cricut message board! Narelle and her family came to Orlando (from Australia) and I was so fortunate to be able to meet them. Narelle and her daughter and I spent a day shopping and chatting. They don't have Michael's Arts and Craft stores in Australia nor do they have Walmarts! I took them to both!  :)  Later that day, my sister and Narelle's husband and son joined us and we had dinner at the Rainforest Cafe in Downtown Disney. It was so much fun! Here's a picture of Narelle and me.


I had made a Disney themed travel planner using a 2-pocket folder and sent it over to her. I hope she found it useful as they had plane tickets and 3 different hotel reservation and bus tours and such to keep up with.


It was very similar to one I made for myself a few years ago. I had designed it using Design Studio but lost the file when my computer crashed. Fortunately, it was easy enough to re-create.


And, of course, you can't go to Orlando with going to visit Mickey Mouse. My sister and I went to Mickey's Not So Scary Halloween Party and I used my Cricut to cut little Mickey heads out of vinyl for our finger nails.


After dinner, I'll get some Halloween projects posted! So I hope you'll check back again!    :)

Monday, September 19, 2011

Halloween Bucket


It's that time of year when people are starting to think of Halloween. I've recently received a few questions about the Halloween Bucket I made a few years ago that is in the Project Gallery. The images on the sticks are from Paper Doll Dress Up. I cut two of each image and glued them together around the edges of the side and top. Then, I painted tiny dowels orange, cut them to size and slide the image on. The bucket is a plastic witches cauldron filled with candy. The title, Happy Halloween, is a font that was cut with a Wishblade.

Saturday, September 10, 2011

Mom's Sewing Box

During her lifetime, my mom was an amazing seamstress. She made all sorts of clothes, mostly dresses, for my sisters and me. I remember her big wooden sewing box. It had so many little boxes and drawers. I decided to try to recreate it using paper. The design is basically four boxes that are attached with paper "hinges" and brads. I used Design Studio and the George and Basic Shapes cart to create the boxes. The beautiful pattern paper is by Cosmo Cricket and aptly named Remnant. I used Mini Monograms for the shapes to make the tag and used the Cuttlebug Language of Love embossing folder. My mom used her box to hold buttons and ribbons and lace and such that she would use to adorn her sewn creations. I'll use my little paper box to hold buttons and ribbons and flowers and such to embellish my little tags and cards. Thanks Mom!  :)