Showing posts with label Christmas. Show all posts

Tuesday, September 17, 2013

Dashing Through The Snow. . .

Here's a cute little card I made using the Create A Critter cart and the Snowflakes embossing folder. And for fun, I attached the reindeer using an action wobble that I got from TheScrapbookingQueen! That cute little reindeer rocks back and forth, just like he was dashing through the snow!


The inside of the card reads "to wish you a Merry Christmas!". What fun the action wobbles add! Have you tried them yet?

I linked my card up to the Action Wobble Challenge Blog!

Wednesday, January 2, 2013

A Few More Christmas Gifts

For each of my Sister-In-Laws, I added their name and Merry Christmas to a plastic platter. I used Plantin Schoolbook for the name and Quarter Note for the Merry Christmas. The platters came from Walmart.


For my nephews and niece, I found ear buds with a retractable cord {oh how I dislike those wires flopping around}. Since they were all the same, I used a bit of vinyl and added a monogram. The boys have a single letter monogram that I made using Varsity Letter and the girls have a 3 letter monogram I made using Stork's Delivery.


And my cute little puppy dog got a pink tote bag {to carry all her stuff when she goes to be boarded} and I added her name using Heat Transfer Vinyl.


Tuesday, January 1, 2013

All Hearts Come Home for Christmas

This is a floating frame {we placed a piece of white paper in the frame because she wanted to display it on her buffet table} I made for my MIL for Christmas. I used a variety of Cricut carts {Craft Room Basics, Something to Celebrate, Art Philosophy, Joys of the Season, Christmas, MS Seasonal Cake Art, Beyond Birthdays and Quarter Note} and designed it in CCR. I then cut the design in vinyl and used transfer tape to apply it to the outside of the frame. I used a 12 x 12 frame from Hobby Lobby.


Tuesday, December 11, 2012

Elf Shoe Cookie Wrapper


Here's a quick and easy gift for co-workers or neighbors. It's an elf shoe that wraps around a stack of red filled Oreo cookies! I used the elf shoe from Teddy Bear Parade and a scallop circle from Craft Room Basics and CCR to make the wrapper. Just stack your Oreos in a clear treat bag {somehow the ribbon covering the twist tie when missing before the photo}, wrap the shoe around the stack and glue the sides of the shoe at the toe end. Fold down the flaps and glue the scallop circles onto the tip of the shoe. Viola! An Elf Shoe gift!


Monday, November 26, 2012

Santa's Stash

Take a plain ole container from the Dollar Tree. . .


Add a little white vinyl and you get a cute treat container!


I used Paper Lace for the font and Billionaire for the moustache. Easy peasy! I might tie a ribbon around the top, but I can't decide. What do you think? Ribbon or no ribbon?

Tuesday, November 20, 2012

CCR file for the Holiday Tags


I've had numerous requests for info on how I changed the Holiday Card file into the tags, so here you go: I placed the image on the mat in CCR and used the Hide feature to hide the card outline. I used a tag from George and Basic Shapes and made it the size I wanted {2.5 inches wide and 3.5 inches tall in this case}. I then moved the image from the Holiday Card over onto the tag and sized it to fit. Do not Weld these two images. I cut the tag with the images in red vinyl with settings of 3 for blade depth, 3 {med} for pressure and CCR controlled the speed. I cut a plain tag in white.

I used a piece of transfer tape that was bigger than the entire image and burnished it across the entire image. I flipped the vinyl/tape over {face down} and started peeling back the paper backing. I only took of the cut out image and left the little pieces on the paper backing {this did take a little fiddling to keep them stuck in place on the backing}. Once I had the tag image completely off, I aligned it with the white tag and burnished them together. Then, I took the piece of transfer tape and laid it over the remaining pieces on the paper backing, burnished it and picked up all those pieces onto the transfer tape and placed it onto the glass candy jars {which were only $1 at Dollar Tree}. It really was rather easy!


Monday, November 19, 2012

Christmas Tags from free images in CCR

Provo Craft has been giving free images to use for a week in CCR. . .sort of a try it before you buy it promo. Well, this week the images are some of the Holiday Cards. I really like the images, but I'm not a card maker! So what's a crafter to do? Use CCR to change them up and make them into tags!


I used CCR to "hide" the card edge and added the tag from George and Basic Shapes. I cut a solid white tag to use as the base. And, because I knew they might be "fiddly" to glue down, I cut them in red vinyl.  Easy Peasy. . .beautiful tags! And the great surprise was, the part that I weeded away was usable too! I put them on some glass candy jars.


These images are free for anyone with a CCR account to use. And yes, CCR is a free design program for your Cricut! Off to cut a few more and the "freebies" are usually changed on Wednesdays!

Thanks for stopping by!

Monday, November 12, 2012

Christmas Candy Purses

Since the Christmas candy was still out from the Candy Dispenser Boxes, I decided to cut a couple of candy purses {previously seen HEREHERE  with tutorial and HERE on my blog} and decorate them for Christmas.


These are really cute and really easy to make and a good way to use up scraps of paper! Thanks for stopping by!

Saturday, November 10, 2012

Candy Dispenser Boxes


Welcome to the Holly Jolly Blog Hop hosted by Kristen at My Fantabulous Life! You should have come to my blog from Darcy's Blog. If you didn't and want to start at the beginning of the hop, go to Kristen's blog. We've got a lot of great Christmas projects for you to enjoy, so let's get to it!

The project I created for the hop is a cute, little paper Candy Dispenser! I designed the box in CCR using Craft Room Basics and George and Basic Shapes. A friend had seen THIS paper candy dispenser and asked me to make one for Halloween. I used the basic cube box and tweaked it a bit and made a Frankenstein box for her. I knew right away I would be making more of these boxes. I used my same CCR file to cut these boxes and decorated them for the holidays!


I hope you enjoyed seeing my project and will visit my blog again! Now, it's time to hop on over to Cindy's Blog and see what she has ready for you!

Happy Holidays!

Thursday, July 26, 2012

Believe In The Magic


I made this wall hanging using the Cricut cart Out of Character, Craft Room Basics image set and Cricut Craft Room.. It's such a fun and funky cart! There are 4 different fonts and none of the letters match! It was fun finding the right combination of letters to create this project.

But, you may notice that your Out of Character doesn't have the same letters as mine. Why? Because I used CCR to weld some of the letters together to "create" a new letter or took some of the letters and flipped them to create the look I wanted.

Here's the breakdown:

B. . .font 3 plus the "L" is flipped, smushed and welded to the "B"
e. . .font 4
l. . .font 4 with a parenthesis welded to make it thicker
i. . . .font 4 with the flower dot hidden and a regular dot used
e. . . font 2
v. . .font 2 with the inner cut hidden
e. . .font 4

i. . .it's actually the exclamation point from font 1, flipped
n. . .it's the "u" from font 4, flipped

t. . .font 2
h. . .it's the "y" from font 3, flipped
e. . .font 3

M. . .font 3
a. . .font 3
g. . .font 3
i. . .another exclamation point, this one from font 2, flipped
c. . .font 1

I cut the scallop rectangle and circle from Craft Room Basics, The Santa image is from a clipart CD. I used an old necklace to hang the the scalloped rectangle and to dangle the scallop circle. The little bit of sparkle you see is from Mod Podge Dimensional Magic that I used to cover little white star shapes that were part of the paper design.

What Cricut images have you used differently from the way they were designed?

Sunday, July 15, 2012

Christmas Treat Cone!

All the Christmas in July events made me want to craft something Christmasy! So here is a little treat cone filled with M&Ms! I used the 3D Party Cones digital images and cut the cone from the plastic clamshell from a Cricut cart. I used the Swiss Dots embossing folder to emboss the cut image and then used Terrifically TackyTape to assemble the cone. I made the tag by printing the sentiment on my computer and cutting it with my Cricut using Mini Monograms along with the red and white layers.


I think I'll make more {I have tons of the plastic!} around Christmas time and put the M&Ms or maybe peppermints in a little bag and place that in the cone. So, what do you use the plastic clamshells from all your Cricut carts for?

Friday, December 9, 2011

Sophie Circle Magazine Contest

Each month, the Circle Magazine hosts a contest for Circle Members. This month, the contest is based on the images from the Sophie cart. The rules were to use the exclusive Sophie cart to create something fabulous for the upcoming holiday. The project needed to use at least 3 images from the Sophie cart.

I decided to use the background shapes as the base for the numbers on my advent calendar. I first use CCR to create a little gusset pocket with the Craft Room Basics cart and the George cart. I cut 24 out of a metallic holly paper, scored, folded and glued them to the base (which was also the metallic holly paper). I then chose 4 different background images from Sophie and I cut 3 of each image in red and 3 of each in green. I glued those to the pockets. I used Nursery Rhymes for the numbers and glued those to the pockets. I added a couple of red bows and viola! My advent calendar was ready to fill with little goodies for each day.

This is how it looks partially filled. My nephew volunteered to eat the candy for the first 9 days!
And this is a view looking down into the pockets.

Saturday, December 3, 2011

Santa's Magic Key

Welcome to the Sophie Cartridge Blog Hop hosted by Michele. We wanted to share some of the really nice images from the Sophie cart. If you just happened upon my blog and want to start at the beginning of the hop, go to Michele's blog. If you're already hopping along, you should have arrived here from Liz's Bog.

My project for the hop is. . . a Santa's Magic Key hanging. In case you don't know, there is a legend that Santa's magic can make an ordinary key open your door. This is great for children who live in homes without a chimney. But, it also works for children who do have a chimney but want to make it easier for Santa to get into their house with all those presents!

{you can click on the photo to make it a little larger}

I first searched for Santa Magic Key poems and when I couldn't find one I liked, I took the parts I did like and added some to create my own version. I printed it on ivory cardstock and cut it out using the frame background and CCR. I printed the image off center so I could hang the key and not block the words. Here's the poem I used. You can use it too, or make your own.


Santa's
Magic Key

It's the night before Christmas and we're excited as can be!
We're leaving this key
so you won't have to squeeze down the chimney.
Your magic makes the key fit right
and you can come in the door tonight.
Thank you Santa, for the presents you will leave by the tree,
And don't forget. . . the milk and cookies are on me!


I then cut the frame and glued it to the wording. I cut the key 5 times, 3 in gold cardstock and 2 in gold glitter cardstock (flipping the key image to get a front and back). I glued all those layers together and tied a ribbon. To hang the key, I punched a hole for a brad and when closing the brad, I left a little room between the brad head and the paper. That gave me enough space to slip the ribbon on and off the brad.


I then hid the interior lines of the frame in CCR and cut another frame in red. This one, I glued to the back.

I hope you like my Santa's Magic Key project and thanks for visiting my blog! Your next stop on the hop is Megan. Before you go, if you would like a chance to win this project, become a follower of my blog and leave me a comment stating you want a chance to win. I will randomly choose one person and send Santa's Magic Key to them!

Friday, December 2, 2011

Acetate Santa Tag


This little tag was actually a happy accident! I was stamping the Santa image on recycled plastic from the clamshell of a Cricut cartridge and then it wasn't flexible enough for the project I had in mind. So I created a frame in CricutCraftRoom and viola. . .it became a tag! You can't tell in the photo, but the part with the Santa image is actually clear {there is white paper behind it in the photo} and when the tag moves, you can see the image of Santa watching you! So you better be good, for goodness sake!  :)

Thursday, December 1, 2011

Christmas is Coming!

Since the wreath that hangs over our mantel at Christmas time has seen better days, I decided to replace it with a  frame. I used glittered paper and what was suppose to be a window decal of Santa inside the frame and vinyl lettering outside the frame. I can't wait to hang it with the stockings and garland on the fireplace!


{And, I see I need to straighten the word Magic before it goes up! Note to self~buy some CLEAR transfer tape!}

Here's a "corrected" project photo. It looks so much better with the word Magic straight!  :)

Saturday, November 5, 2011

Christmas Tree Tea Light


I am so excited to be hosting a Winter/Christmas themed Blog Hop today! Nineteen other creative crafters have a winter or Christmas themed project {some blogs have both} created for you! So sit back, relax and start hopping!

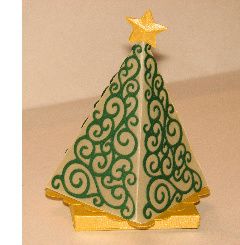
My first project for the hop is a Christmas Tree Tea Light Holder {you know I love those little battery operated tea lights}!  Today's post will have the photos and there will be a tutorial and cut file added in a day or two. Sorry I didn't have time to get it ready with all my prep for the South Carolina Circle Meet Up.

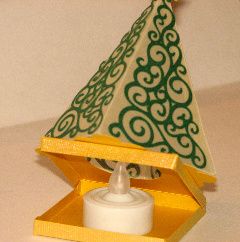
I used CCR and the George cart to create a four-sided triangle box. Then I layered on each side, the swirly tree from the Christmas Solutions cart.  Glued the tree to a scalloped square from Mini Monograms that I had added a circle cutout in the center. Glued that to the shirt box, that also has a circle cutout, from Tags, Bags, Boxes and more. And added a star from George.


I used the shirt box not only for the base, but also for access to a battery operated tea light!

Once the tea light is turned on, close the box and you have a beautiful, glowing decoration or gift!


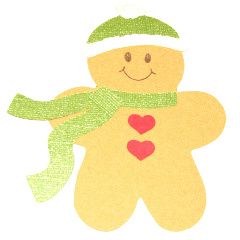
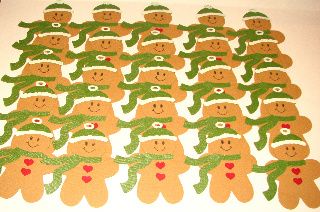
The other project I have today is a cute little gingerbread man, ready for winter! The gingerbread man is from Paper Doll Dress Up, his hat is from Everyday Paper Dolls and his scarf is from Winter Woodland.


But, there's not just one. . .they are 50 of him! This is only half of the group.I made these for a tag swap. I do still need to add the ribbon hanger.

Blog Candy!!!
Before you head to the next blog, become a follwer of my blog {if you aren't already} and leave a comment for a chance to win a Gingerbread Seasonal cart!

Here's the blog hop list:


1. Paulette at  http://scrapalette.blogspot.com/  <<<START
2. Debbie at  http://bugginattheseams.blogspot.com/  <<<Next stop
8. Michele at  http://www.michelegreen.com/ 


Pin It

Sunday, April 17, 2011

Some older projects added to my Project Gallery

I found some photos from last year and have added them to the Project Gallery.

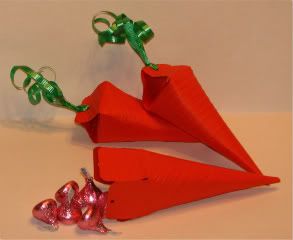
Paper Cone Carrots

Halloween Treat Box with Slider Handle


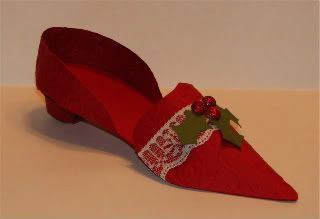
Christmas Paper Shoe